Articles
Using a Raspberry Pi to proxy, capture, and decrypt data from mobile and IoT devices
5 min read
Have you ever wondered what your “smart toaster” was sending back to the internet about you? Or how your WiFi dog food dispenser knows your schedule? Our engineer Tom did, but he didn’t have a great way to capture the network traffic sent by mobile and IoT devices. So he turned a Raspberry Pi into a access point/network proxy capable of capturing packets and decrypting SSL within CloudShark, and now you can too.
Although tools like tcpdump make it easy to take packet captures on a host, how do you get network traffic from a device that doesn’t give you access to its internals? In the past we’ve explored building a capture probe using a Raspberry Pi system. However, for effective troubleshooting of IoT devices, you need to be a kind of “man-in-the-middle” - capturing packets as they cross from the device to the network. By creating a WiFi access point combined with MITM Proxy you can easily create a platform to let you investigate all the smart devices in your home.
Read on to learn more about different kinds of proxies, and how you can use them to intercept, analyze, and even decrypt some data with CloudShark.
What is a proxy?
There are many, many use cases for proxying network data. Most commonly, this is done at the application layer (i.e., HTTP/HTTPS) to perform all sorts of useful functions like load balancing, anonymization, security monitoring, flipping images upside down, and more. While the uses are wide and varied, the fundamental idea is that a proxy is acting as an intermediary that terminates application layer data connections (though sometimes even done at the level of TCP), performs some operations, and forwards the data to the original client or server. Different proxy functions require drilling down to different levels of information, so some are more invasive than others (for example, load balancing may only require very high-level information, whereas a content filter may need to look at the actual content of an HTTP session).
Proxies generally function is one of two modes. In regular mode proxies, the client is aware that it is contacting a proxy server first, and has special configuration information about the proxy it is assigned to use.
In a transparent mode proxy, the client cannot avoid the proxy and is usually unaware of the fact that it is being proxied (though several detection methods do exist). The advantage here is that the client requires no special configuration - a firewall can be configured to redirect the traffic of all clients sending traffic through them.

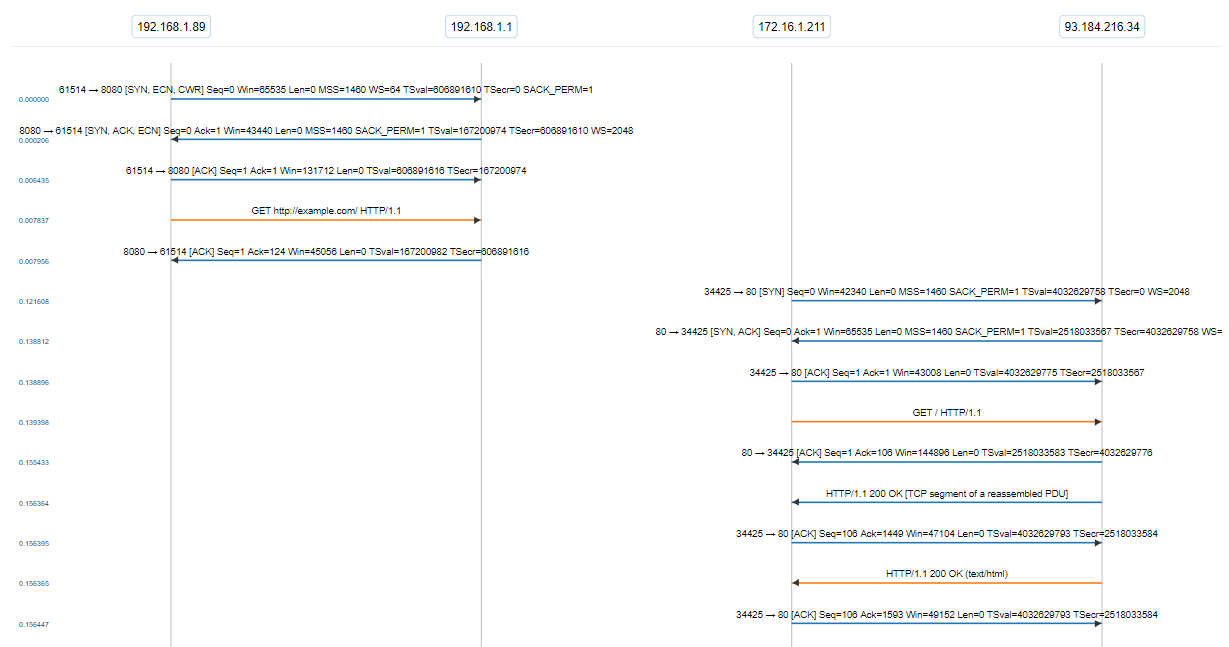
Take a look at this packet capture. You can see the client traffic coming into the proxy at the first IP interface, which is then sent out of the second interface.
Caveats of using a proxy
HTTPS connections cannot, unfortunately, be proxied quite as easily as HTTP. Since TLS authentication is built to ensure that a particular endpoint is really who they say they are, the TLS certificate of the proxy needs to be added to the Certificate Authority’s (CA) chain of trust. There are some ways around this, if the client can be tricked into trusting the certificates of the proxy, but this is usually not a legitimate practice and indicative of poorly secured software.
This prevents the use of proxies for applications that use certificate pinning - that is, the certificates of the application server are hard-coded into the client, so any attempt by a proxy to intercept and forward traffic to the server will cause authentication to fail.
Pi-in-the-middle
We’ve put together a code base for you to use that follows this methodology. You can find it on our GitHub page at:
https://github.com/cloudshark/pi-in-the-middle
This project is a collection of scripts that configure the Pi as a wireless access point using mitmproxy to act as an HTTP/HTTPS proxy. Then we use tcpdump to capture data, which is pushed to a CS Enterprise system or CS Personal account using an API key. It’s written in Python, and we tested it using a Raspberry Pi 3 Model B running Raspbian Stretch Lite.
Mitmproxy and SSL KEYLOG files
We use the mitmproxy server in our pi-in-the-middle implementation. In addition to being relatively easy to use and set up, mitmproxy gives us the ability to dump the SSLKEYLOG file used during the sessions.
Why is this important? The KEYLOG file is what gives us the ability to fully decrypt the packet captures that are traversing the proxy. This is extremely useful for debugging applications that use secure connections, or encrypted traffic sourced from a smartphone or IoT device. Working with the CloudShark Upload API’s option to send the KEYLOG file along with the capture, we can view the decrypted traffic and jump right into some real troubleshooting.
Getting the packets is always valuable!
We’re always interested in finding or creating new ways of getting packet captures - they are your most valuable resource when it comes to troubleshooting network, application, or security issues. Devices that can’t support native capture present unique challenges that require external tools like this one in order to get at the data! Try it out for yourself and let us know what you think.
Want articles like this delivered right to your inbox?
No spam, just good netwokring